

How To Repair Hdmi Port On Ps4
The Playstation 4 is a dandy panel, simply unfortunately information technology comes with some design flaws that can cause information technology to break. One of these issues is the HDMI port. It is fragile and is oftentimes one of the first things to get damaged on the console.
One of the signs of a broken HDMI port on the PS4 is a no film or a "no signal" message on your screen. There are other symptoms likewise, which I volition talk over in this commodity. I volition as well show you how to fix the problem by replacing the HDMI port. Even though it is non the easiest repair and the Playstation 5 is already out, it might however be worth it for you to set up.
Permit's dive in!
Earlier showing yous the steps involved in repairing the HDMI port, I volition respond some frequently asked questions.
What is the HDMI port used for?
The HDMI port in a PS4 relays the video (and sometimes audio) signal from the Playstation to a display device such equally a TV.
Can y'all use the PS4 without HDMI?
It is not possible to use your PS4 without HDMI because the console does not accept any other video outputs. It besides does not have driver support for USB to HDMI adapters, so outputting video through i of the USB ports is not an option either.
How can yous tell if PS4 video bug are acquired by a cleaved HDMI port?
If after turning the Playstation 4 on, the console shows a white lite and the Tv shows a blackness screen (sometimes accompanied by a "no input" or "no signal" message) or shows a distorted video output, so it is likely that the HDMI port or HDMI controller chip is defective. This is oftentimes referred to as the White Lite of Decease.
If the lite on the console does not turn white, but stays blue instead, then yous are dealing with a different issue altogether. This happens when the PS4 is not able to kicking upwardly and is called the Bluish Lite of Death.
While a broken HDMI port is a common cause of video bug on the Playstation 4, it is important to first exclude several other possible causes. There are a variety of reasons why the console might non display video. The nearly common ones are:
- The HDMI cablevision is defective.
- At that place is a conflict betwixt the Playstation and the TV, for case, the Idiot box does non support the console'southward resolution.
- In that location is physical harm to the HDMI port itself.
- Some of the other electronic components in the PS4 are non working correctly.
Troubleshooting
The beginning pace in troubleshooting the result is making sure that the problem does not lie with the HDMI cable or the TV. Usually that means trying a dissimilar cable and a unlike TV to check if that fixes the event. If afterwards this you yet get no signal, then it is probable that a office of the PS4 itself is broken.
Adjacent is to check whether the HDMI port has whatsoever concrete impairment. This could exist a crack in the outer metallic part, pins that are bent or missing, or anything else that looks out of place, like dust or debris in the port.
If the HDMI port is damaged or has something else wrong with it, then this is likely the cause of the video issues, and information technology will need to be replaced (or cleaned in the example of dust/debris within).
If there is zilch visible on the exterior of the port, it is still possible that the small pins of the port on the within of the PS4 are damaged. The simply way to notice out is to open up the PS4. If the port looks fine however, and then it is more than likely that the HDMI controller chip is causing the problem.
What causes the PS4's HDMI port to break?
The main thing that causes the Playstation 4'southward HDMI port issues is that the port itself is too weak. This is due to poor design by Sony, and it causes the port to wearable out fast and get damaged easily. This is especially the case for get-go-generation PS4s.
There are a couple of things that tin can cause the weak HDMI port to break:
- Frequent plugging and unplugging of the HDMI cable. This causes the port to wear out over time.
- Pushing the cable in difficult and/or at an angle . Due to the design of the port, this can move, bend or pause the small-scale pins inside of the HDMI port.
- A sudden force pulling on the cable, such as someone/something pulling the cablevision or the PS4 falling over while plugged in. Bated from damaging the HDMI port, this can also cause the port to shear off the circuit board completely.
As you lot tin see, at that place are a lot of ways the HDMI port can cause issues. To make things worse, the HDMI controller flake on the motherboard can crusade bug too.
What causes the HDMI controller flake to break?
Aside from the HDMI port itself, video problems on the Playstation 4 tin also be caused by a defective HDMI controller chip or its surrounding components. If this is the case, then the broken components need to be replaced. This is rather difficult and best left to a professional.
The HDMI controller bit (Panasonic MN86471A) is a sensitive component and can break due to a variety of reasons:
- (Un) plugging the HDMI cable while the PS4 is on. This is usually fine, but in rare situations information technology can cause the HDMI chip to go damaged. One of the situations in which this can be an event is when the grounding betwixt the PS4 and TV is unbalanced.
- Shorting out of the HDMI port pins. If the pins on the HDMI port brusque circuit, for case when ane pin bends and touches some other i, the controller fleck can suspension.
- Static electricity . If yous have opened up the console to repair or clean information technology, but did not take proper anti-static measures, it is possible that static electricity damaged the controller IC.
Bated from this, at that place is also a possibility that at that place is damage to the HDMI coil filters, or that the traces on the circuit lath near the HDMI port are damaged.
All in all, despite the HDMI port itself often being the culprit, in that location are besides a lot of other possible causes for a Playstation iv to display no epitome. Equally a upshot, this can exist a tricky repair.
Tin can you lot fix it yourself?
Replacing the HDMI port is challenging, but doable if you lot have admission to the right equipment and have confidence in your soldering skills. Fixing the HDMI controller chip is a lot more challenging however. I don't recommend a DIY repair unless you either know what you are doing, or if you see this as a learning feel and don't mind dissentious the panel farther.
Without proper feel or equipment, information technology is possible to not just incorrectly repair the HDMI port or controller chip, but also to practise fifty-fifty more damage to the console. For instance, dissentious traces or pads on the printed circuit lath.
Harm to the PCB is non something that can easily exist repaired and must be done by a qualified repair shop.
Is it worth fixing?
Mayhap, peradventure not. Repairing the HDMI port yourself comes with risk, as you could potentially create more than damage. There is also no guarantee that the HDMI port is the only affair that is damaged, and so fifty-fifty if yous replace it successfully, it might non be plenty to get the Playstation 4 working once more.
Having a professional repair service do the repair for you lot can exist plush and often only comes with express warranty. So there is no guarantee that the PS4 will work for a long time afterwards.
For some people information technology might be worth repairing, whereas for others it might exist meliorate to expect alee at a Playstation 5.
What do you need to gear up the HDMI port?
Unfortunately, in gild to ready the HDMI port on the Playstation 4, it needs to be completely replaced. In that location is no manner to restore the existing, broken port and take information technology piece of work properly and consistently. Bending back the pins or the outer metal might work temporarily if you are lucky. It won't give the aforementioned connectedness as a 100% new port, however, and information technology is likely to break once more.
To replace the HDMI port, yous obviously need a new HDMI port, several tools which are listed below, and some soldering skills. Keep in mind that is a challenging repair and a decent bit of soldering experience is recommended before trying to repair the PS4.
If you lot practise intend to go forward with the repair, the step-past-step guide further down the page will show yous how to do information technology.
What can you do to foreclose the HDMI port from breaking or wearing out?
Even though the HDMI port on the Playstation 4 is fragile, in that location are some things you lot tin practise to reduce the risk of it breaking.
- Plow the console off before inserting or unplugging the HDMI cable. This lowers the chance of impairment to the HDMI controller chip.
- Don't move the console around while it is turned on and plugged in. Moving the PS4 effectually while it is plugged in causes the HDMI connector in the port to move around and perhaps cause a short excursion.
- Don't wrap the cables around the console while they are still plugged in. This might be user-friendly if you demand to motility the Playstation 4 and the cables somewhere else, but it creates a lot of unnecessary stress on the HDMI port. Unplug the cables first, before wrapping them around the console.
- Utilize a brusk HDMI extension cablevision or splitter if you lot demand to oft plug and unplug the HDMI cable. You tin can keep it connected to the PS4 all the time and connect to information technology instead of the PS4 HDMI port. This prevents the port on the panel from wearing out.
How to replace the HDMI port on a Playstation four
What you'll demand

Recommended:
The 6 All-time Microscopes for Electronics Repair
Opening the PS4
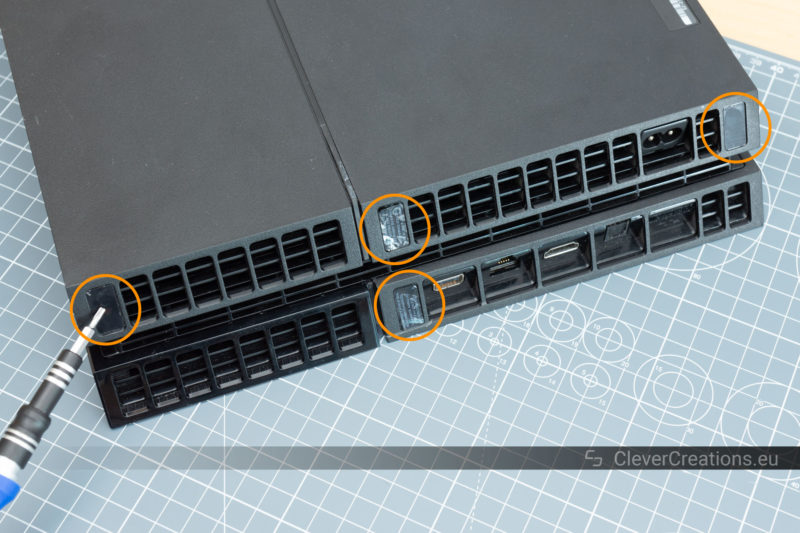
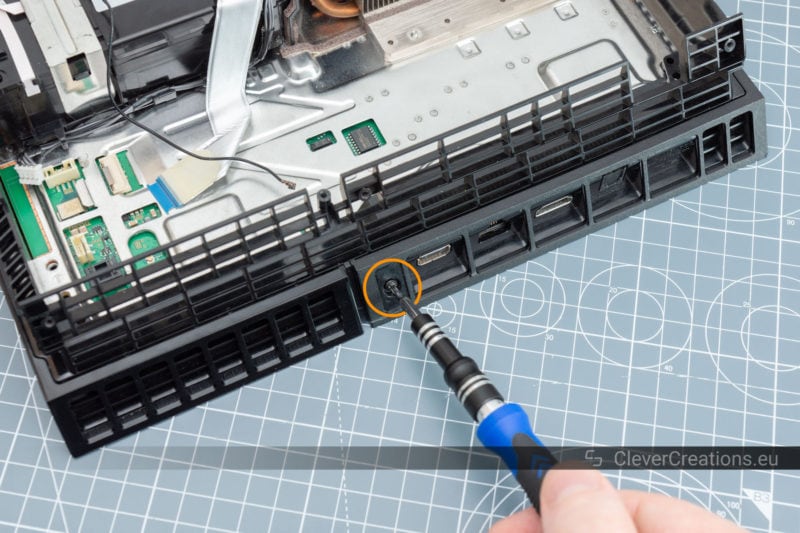
To beginning, we must remove the stickers on the rear of the console. Behind these stickers nosotros find the screws that hold the plastic outer panels in identify.
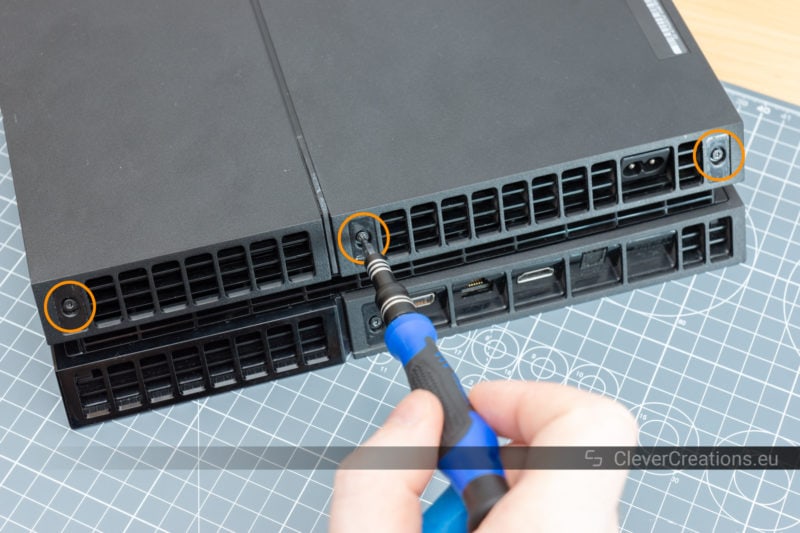
Unscrew the three circled screws. You will demand to utilise a torx fleck for this.
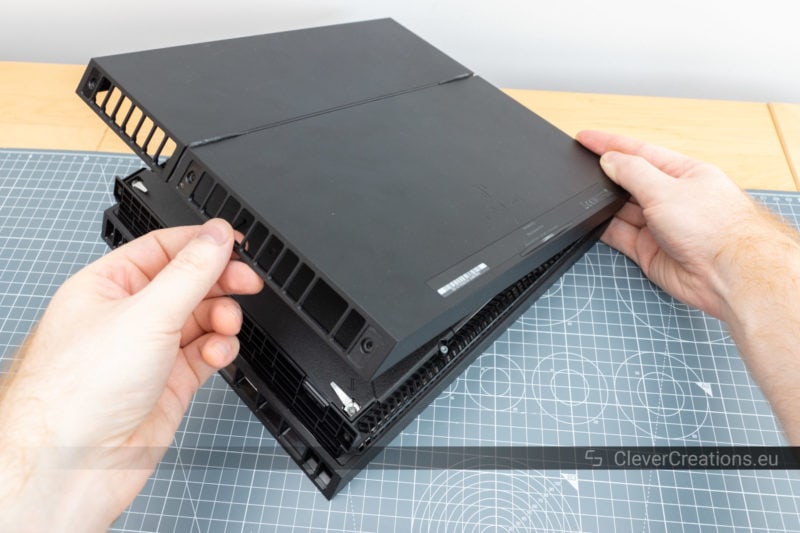
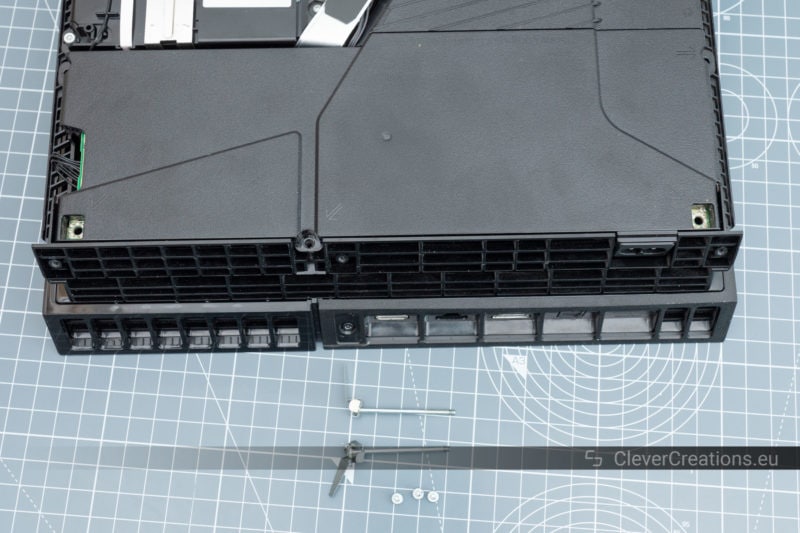
Take the plastic cover off.

Unscrew the 5 screws that hold the power supply in place.
Make sure to keep track of the screws of each footstep. There will be a lot of loose screws at the finish of the disassembly and it is important to not mix them upwardly.
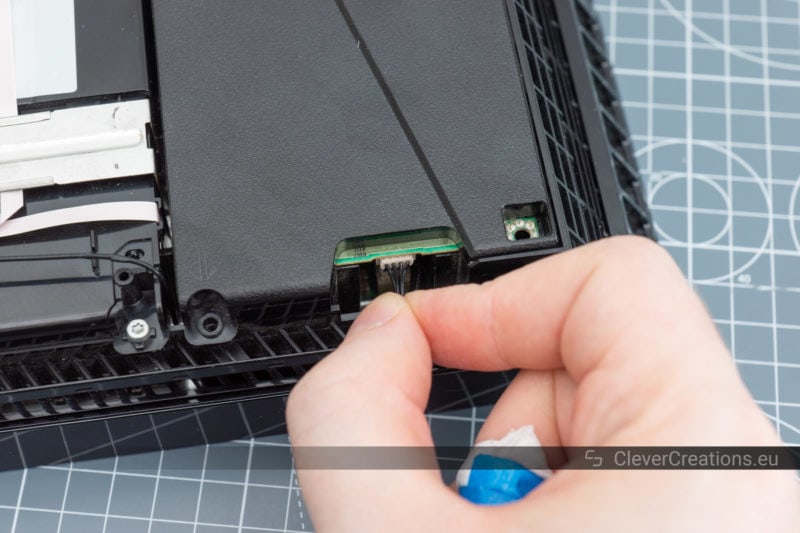
Unplug the small cable that is connected to the ability supply unit. It is important to disconnect this earlier removing the PSU.
Lift the power supply out. It is held in place well, so this might take a bit of force. Holding the PS4 upside down can help likewise.
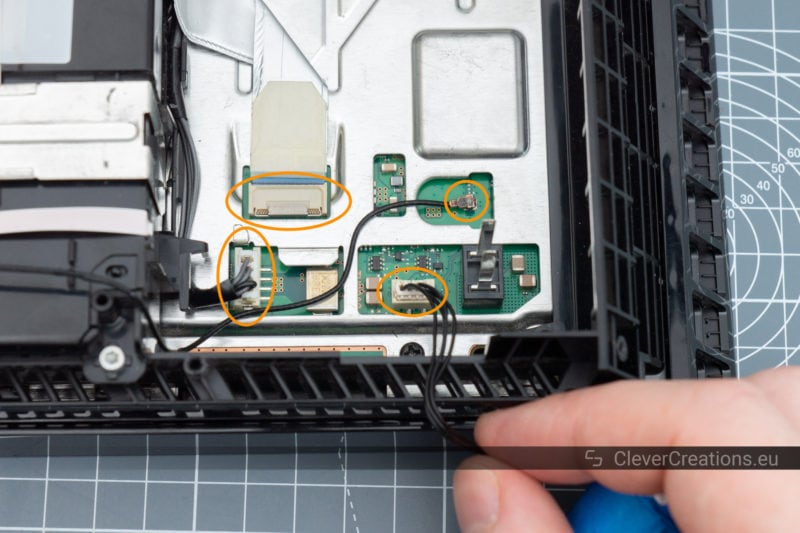
Unplug the circled cables that y'all now accept gotten admission to. These cables are connected to the PS4 motherboard that we will remove later.
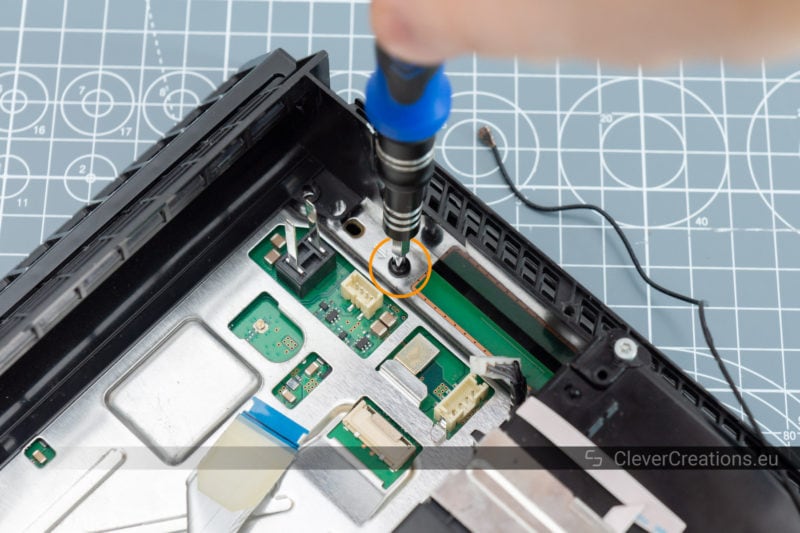
Unscrew the single blackness screw that is circled on the image.
Continue past unscrewing the remaining screw on the rear of the PS4.
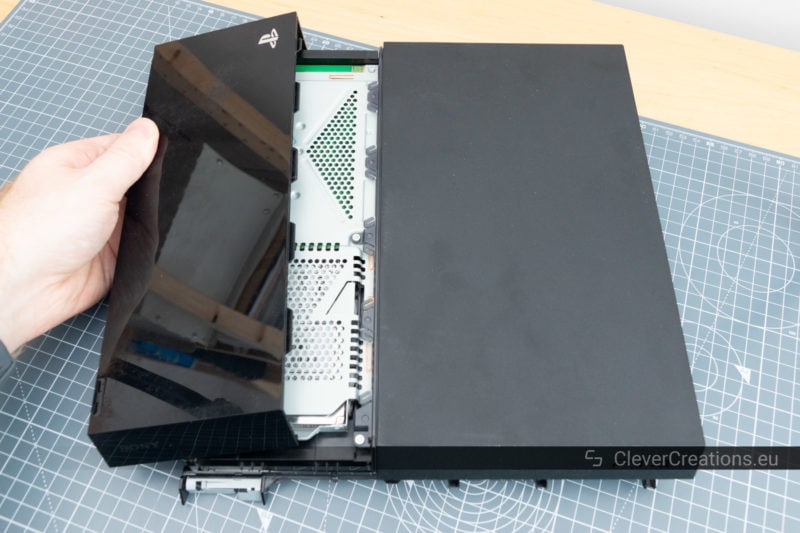
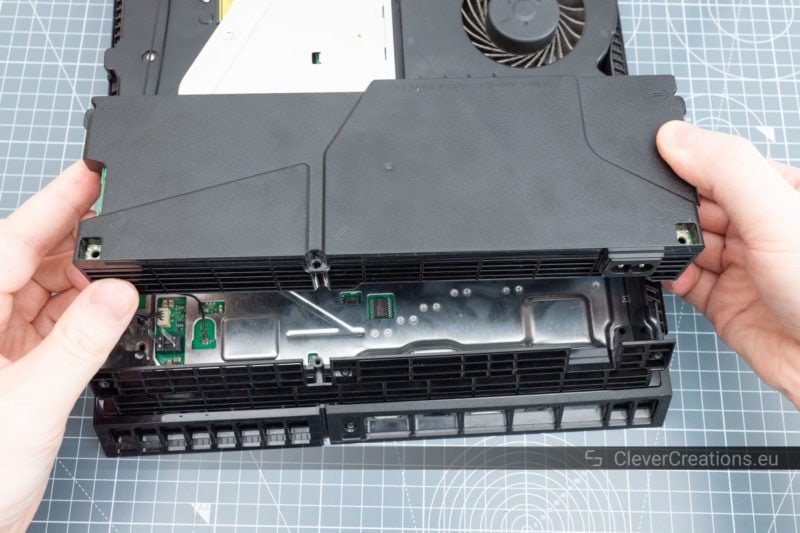
Take the smaller of the two plastic covers on the top off .
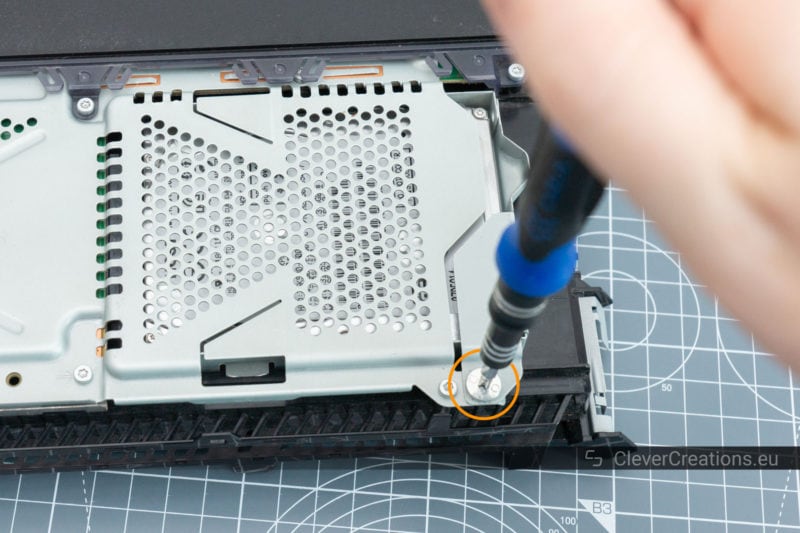
Unscrew the spiral that holds the difficult bulldoze tray in identify.
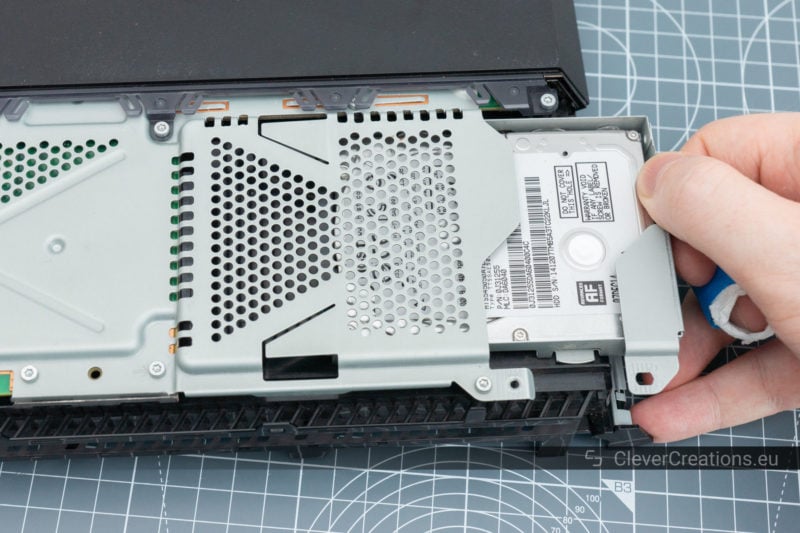
Slide the hard bulldoze tray out and put it aside.

Unscrew the two screws that are used to mount the last remaining plastic comprehend.

Remove the plastic embrace. Brand certain to lift information technology from the right side first (when viewed similar in the image).
Getting access to and removing the motherboard
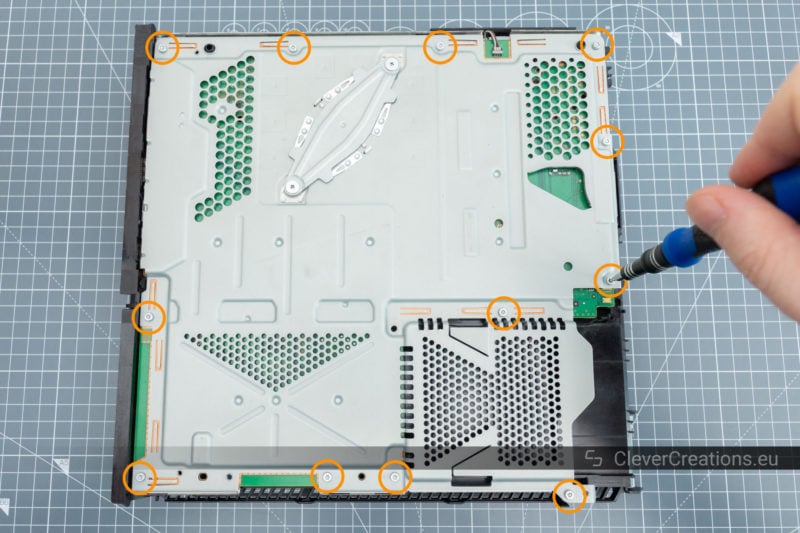
Unscrew the twelve circled screws. Removing the screws will allow us to remove the large metal plate.
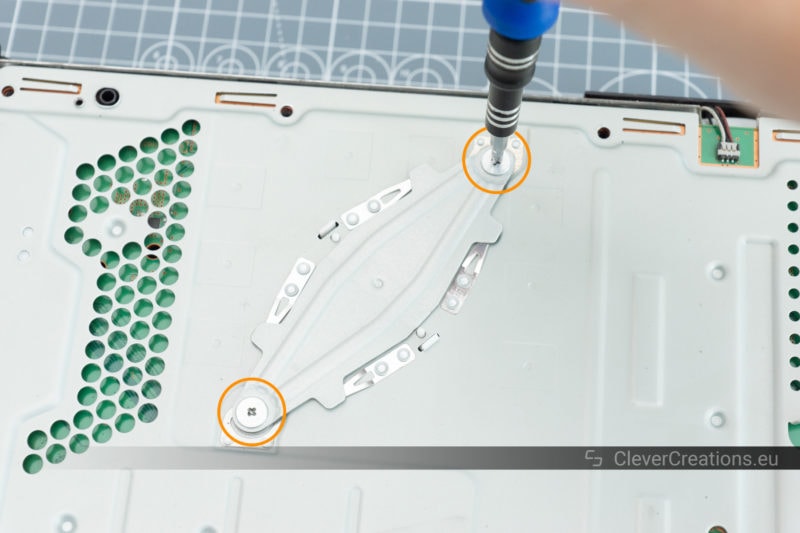
Do the same with the ii larger screws that concord the heatsink clamp.

Remove the heatsink clamp.
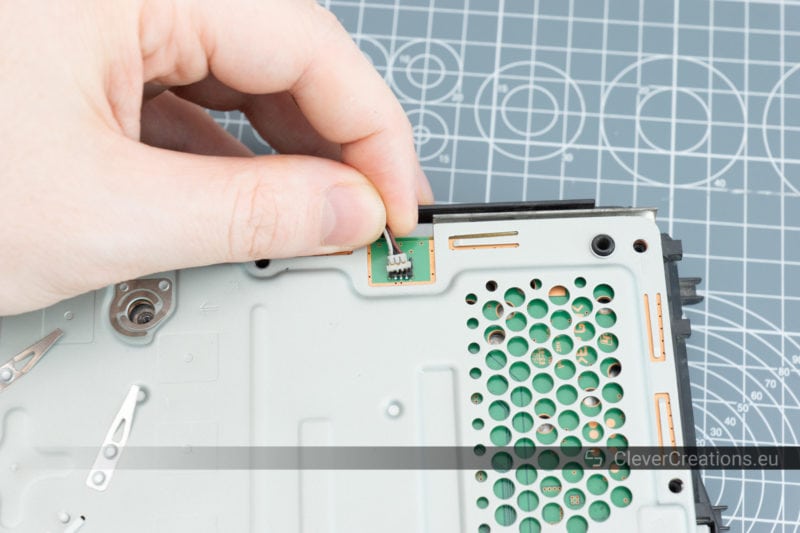
Unplug the small connector in that area.
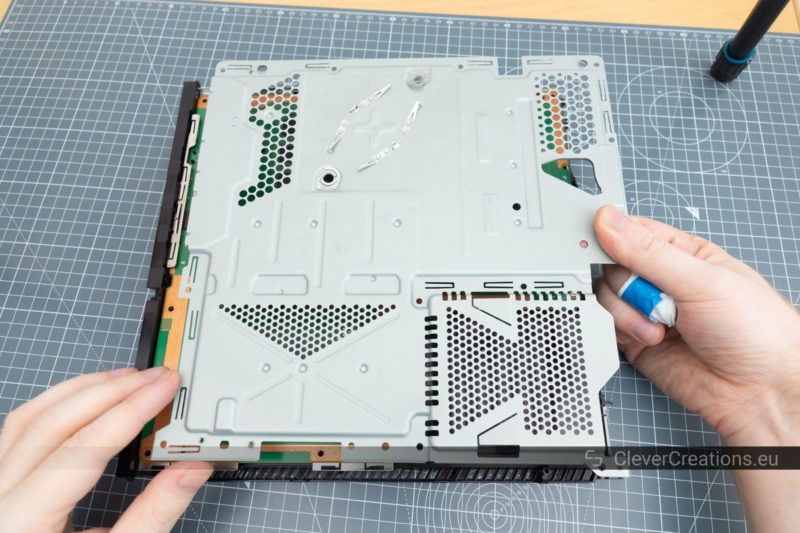
Take the big metallic plate out of the panel.
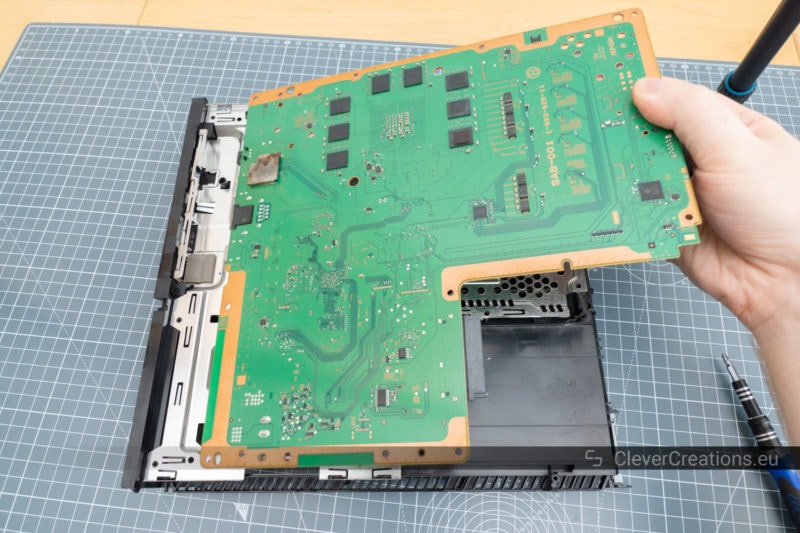
And finally remove the PS4 motherboard. Brand sure to lift the right side up get-go and so pull information technology out along its length, then that the ports on the left don't get bent or otherwise damaged.
Desoldering the HDMI port
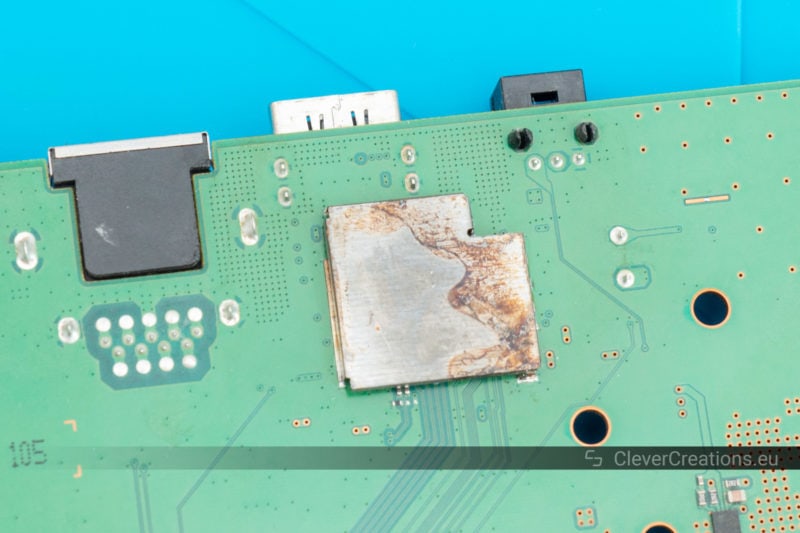
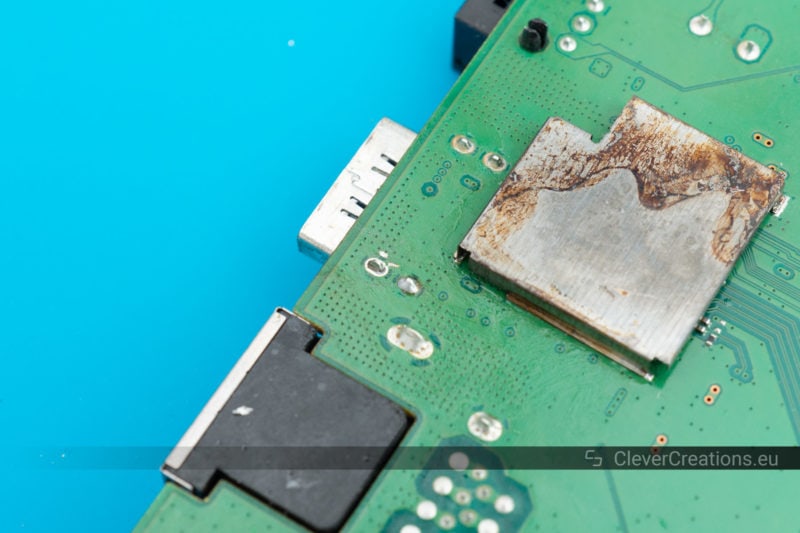
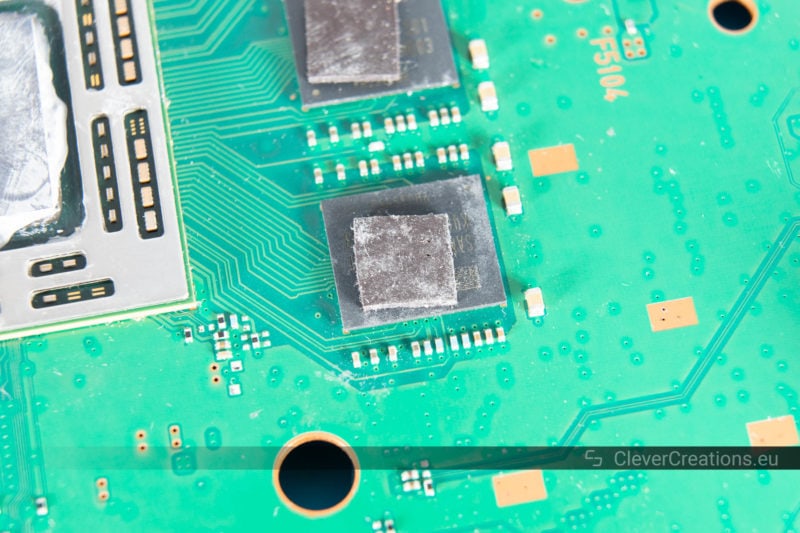
In this PS4, the shield that covers the HDMI controller bit seems to exist heavily corroded. This makes me remember that the problem is likely with the scrap, and not with the HDMI port. That said, I am nevertheless going to supplant the HDMI port for the sake of this guide and so that I can exclude it as a possible cause of the issue.
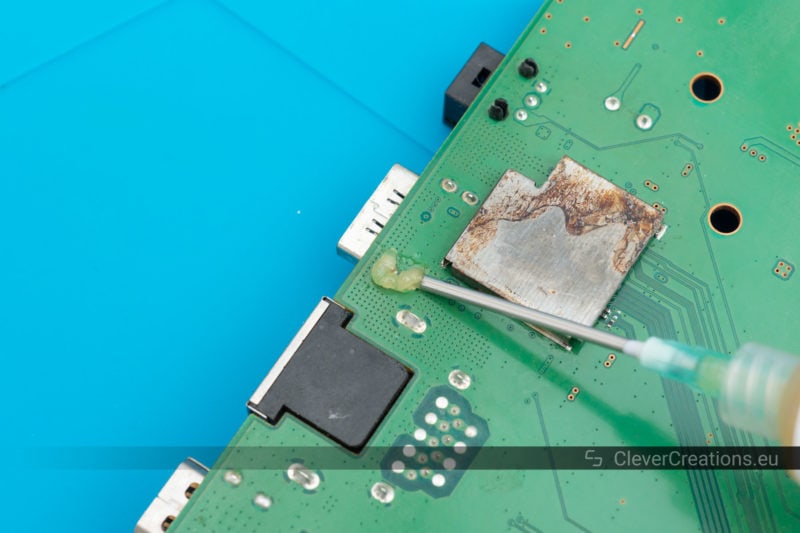
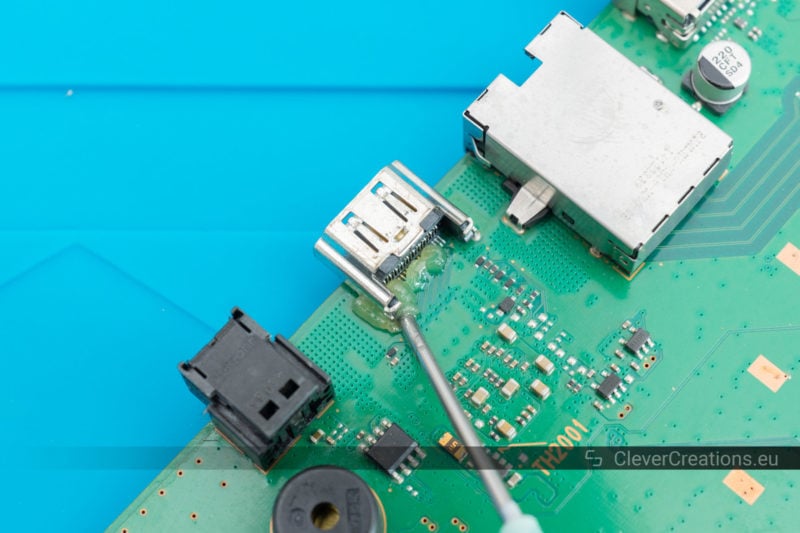
The start step in desoldering the HDMI port is to use flux to the large pins. Flux will help with the desoldering procedure.
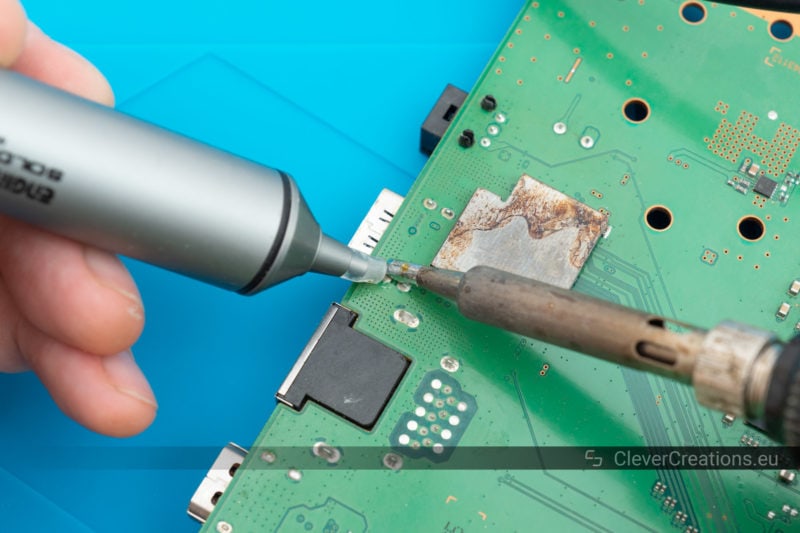
Utilise a soldering iron and a desoldering pump to remove every bit much solder equally possible from i of the pins. I recommend using the Engineer SS-02 solder sucker. It has a silicone tip that makes removing solder a lot easier than with other desoldering pumps.

Recommended:
Engineer SS-02 Solder Sucker Review
Ideally, the pivot would exist 'floating' and not connected to the PCB with any solder at all. But don't worry if in that location is still some left.
Repeat the steps from higher up for the other three large pins of the HDMI connector.
Flip the lath over and utilize flux to the HDMI port pins on the other side of the PCB. Now that the large pins have been mostly desoldered, we can focus on the smaller pins.
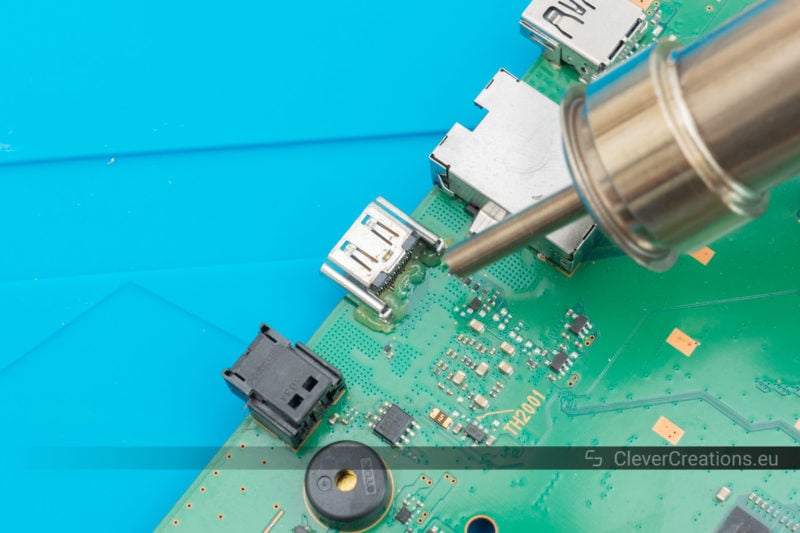
Utilise a hot air gun to melt the solder on the pins. Slowly move the nozzle of the hot air gun in circles over the area. This avoids thermal stress from only heating a single point on the board.

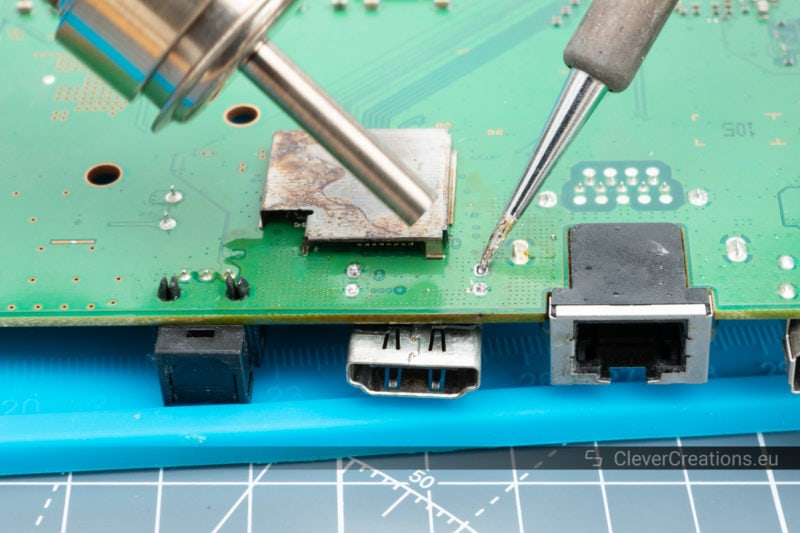
One time the expanse is hot plenty, the solder on the pins will have molten and you can remove the HDMI port. If in that location is too much unmolten solder left on the larger pins, y'all can flip the board over and use a soldering atomic number 26 to speed up the heating. You can gently push down with the soldering iron once everything is molten to move the HDMI port out of the through holes.
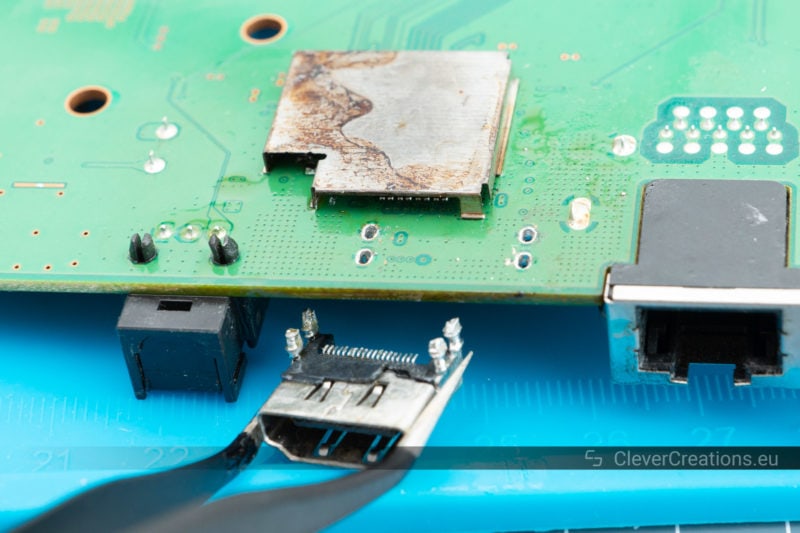
When the HDMI port is loose, you tin can utilize a pair of tweezers to remove information technology. It is going to be pretty hot at this point, so don't touch it.
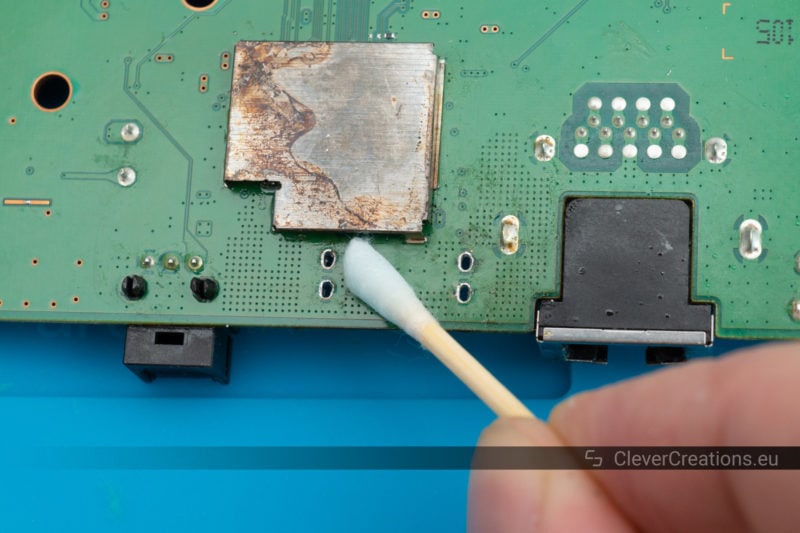
Employ a cotton swab with isopropyl alcohol to remove the leftover flux residue. The board and especially the solder pads need to be make clean earlier soldering the new port in identify.
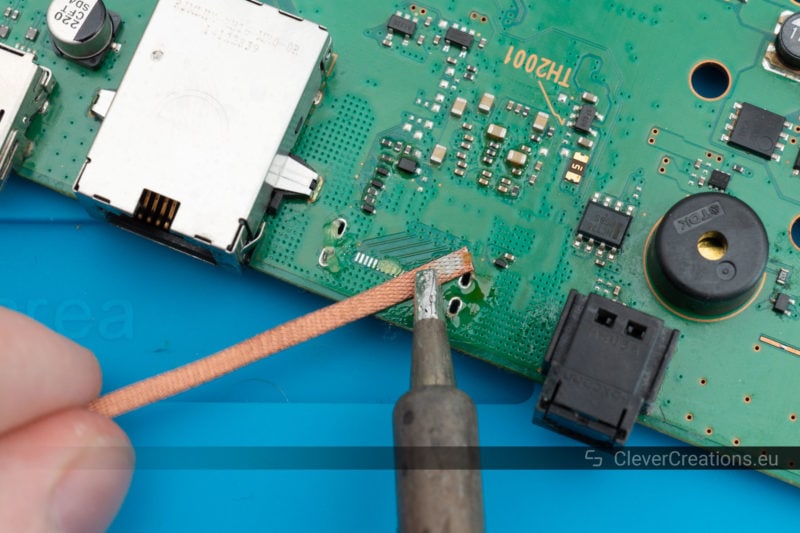
Clean the solder pads on the other side of the board with solder wick, flux and your soldering fe.
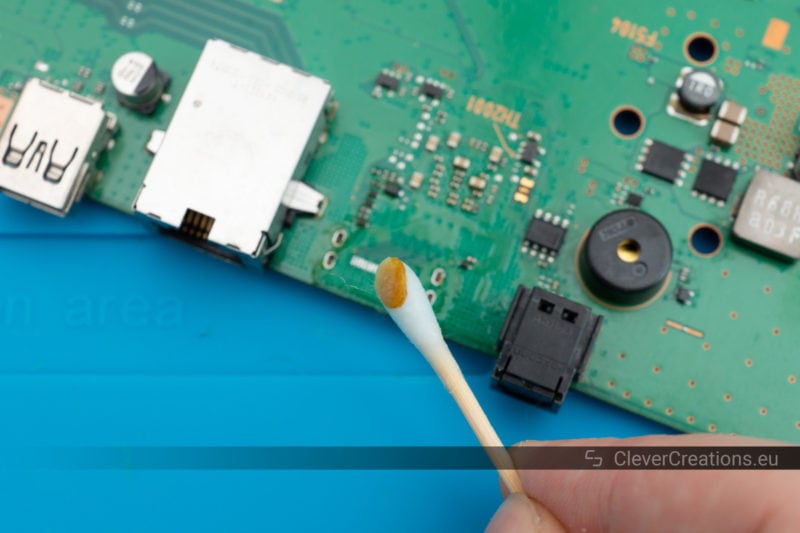
Wipe the flux residue from the lath and solder pads.
Soldering the new HDMI port
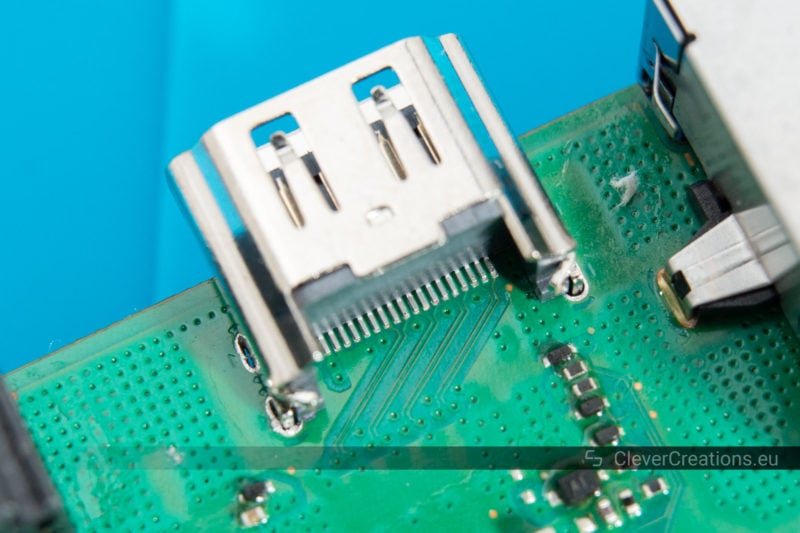
Once everything is make clean, yous can insert the new HDMI port into the through holes on the board. It should fit right into the large holes, with the smaller pins lining upward with the pocket-sized solder pads.
Adjacent is to solder the small-scale pins of the HDMI port. This is a tricky process, and you will need some form of magnification to see if the small pins are soldered correctly. I didn't take equipment to photo/picture with magnification while I was soldering, then for the solder process I will refer you to this video:
Reassembly
After replacing the HDMI port, you tin can reassemble the panel by doing the disassembly steps in reverse.
When reassembling, make sure that all of the thermal pads on the memory chips are however in identify. They usually proceed sticking to either the retentivity chip or the metal shielding plate during disassembly, but sometimes they autumn off completely. In that example, you volition need to find them and place them back on their corresponding chip before closing everything up.
A summary of the PS4 HDMI port repair process
- Remove the plastic covers of the Playstation iv.
- Unscrew the screws that concur the power supply.
- Unplug the cablevision that connects to the power supply.
- Remove the power supply.
- Unplug the cables that were located under the power supply and unscrew the black screw side by side to it.
- Remove the hard bulldoze tray.
- Unscrew and remove the large shielding plate.
- Unplug the small connector on the edge of the motherboard.
- Unscrew and remove the heatsink clamp.
- Take the motherboard out of the PS4.
- Desolder the cleaved HDMI port.
- Clean the PCB.
- Solder the new HDMI port onto the board.
- Reassemble the Playstation iv.

Conclusion
As you tin can see, it is definitely possible to repair a Playstation 4 with a broken HDMI port yourself. Information technology is a difficult procedure though, and you do need to accept proper equipment for information technology.
In my example, replacing the HDMI port did not fix the result. This was expected though, given how bad the shielding on the MN86471A controller chip looked. It is likely that I will replace the chip at some point. When I practice, I will update this article with a guide and whatsoever findings.
You learned:
- How to identify bug with the Playstation iv HDMI port and HDMI controller flake.
- Why the PS4 HDMI port and controller fleck pause.
- How to prevent a HDMI port from breaking or wearing out.
- How to fix and supercede a broken HDMI port on a PS4.


Source: https://clevercreations.org/how-to-repair-fix-playstation-4-hdmi-port/
Posted by: wilkinsficky1982.blogspot.com
0 Response to "How To Repair Hdmi Port On Ps4"
Post a Comment